Welcome
This is the Usage Documentation for WhatsApp CRM.
In this documentation, you will find a detailed user manual where you can learn to:
- Initial Setup
- Connect Multiple WhatsApp Accounts
- Mass Messaging
- Multi-Operator Contact Management
- Create Message Templates
- Using the WEB WhatsApp Gateway API
If you are unfamiliar with the procedures outlined, our support team can assist you. Technical Support
Terms of Use
Copyright Disclaimer
This project is not affiliated, associated, authorized, endorsed by, or in any way officially connected with WhatsApp Inc. or any of its subsidiaries or affiliates. The official WhatsApp website can be found at https://whatsapp.com. "WhatsApp," as well as related names, marks, emblems, and images, are registered trademarks of their respective owners.
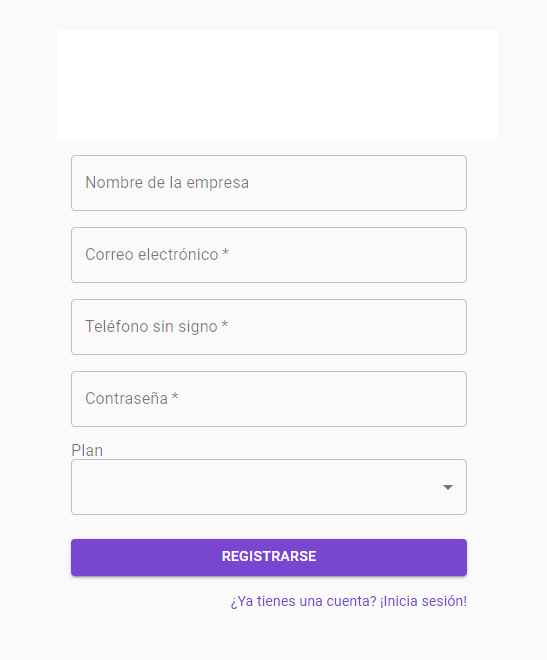
Create an Account in WhatsApp CRM
Creating an account in WhatsApp CRM is very easy; simply go to the registration page and fill in the requested details.
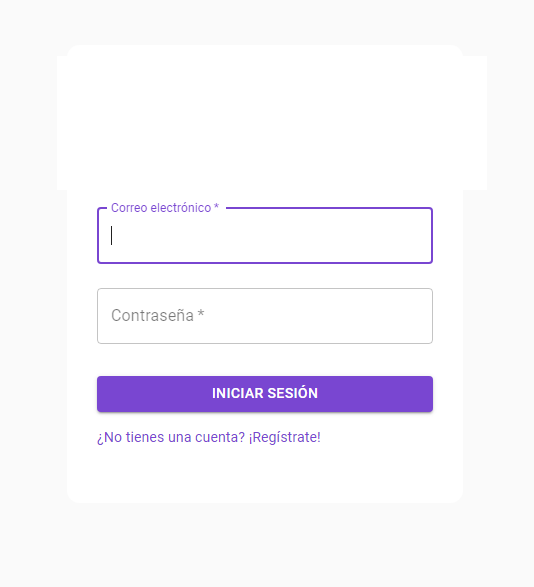
Log In
You can access your WhatsApp CRM account by logging in. Fill out the login form with your email address and password, then click the LOGIN button.
Initial Setup
is a powerful tool that requires an initial setup to maximize the benefits of each function. Before getting started, we need to complete a few simple tasks. WaboTify
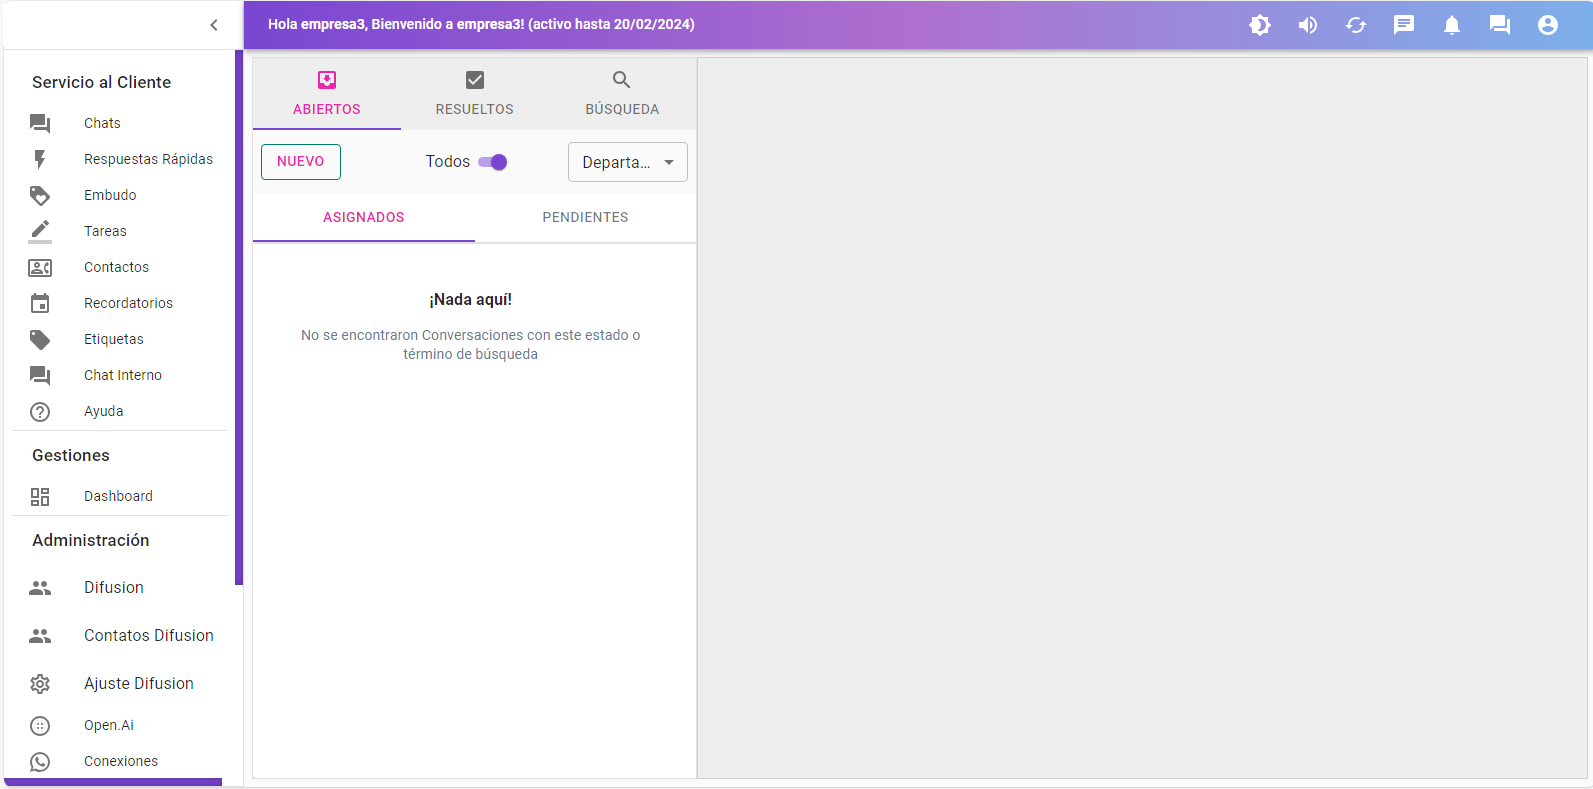
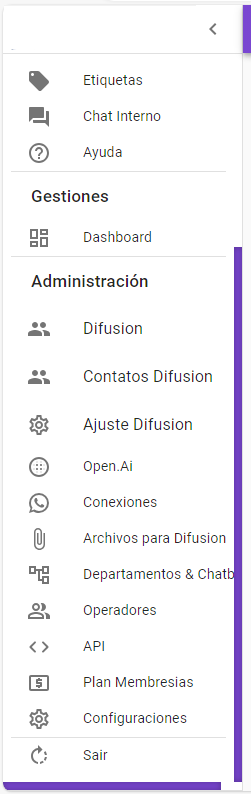
Scroll down the side menu until you find the Settings section
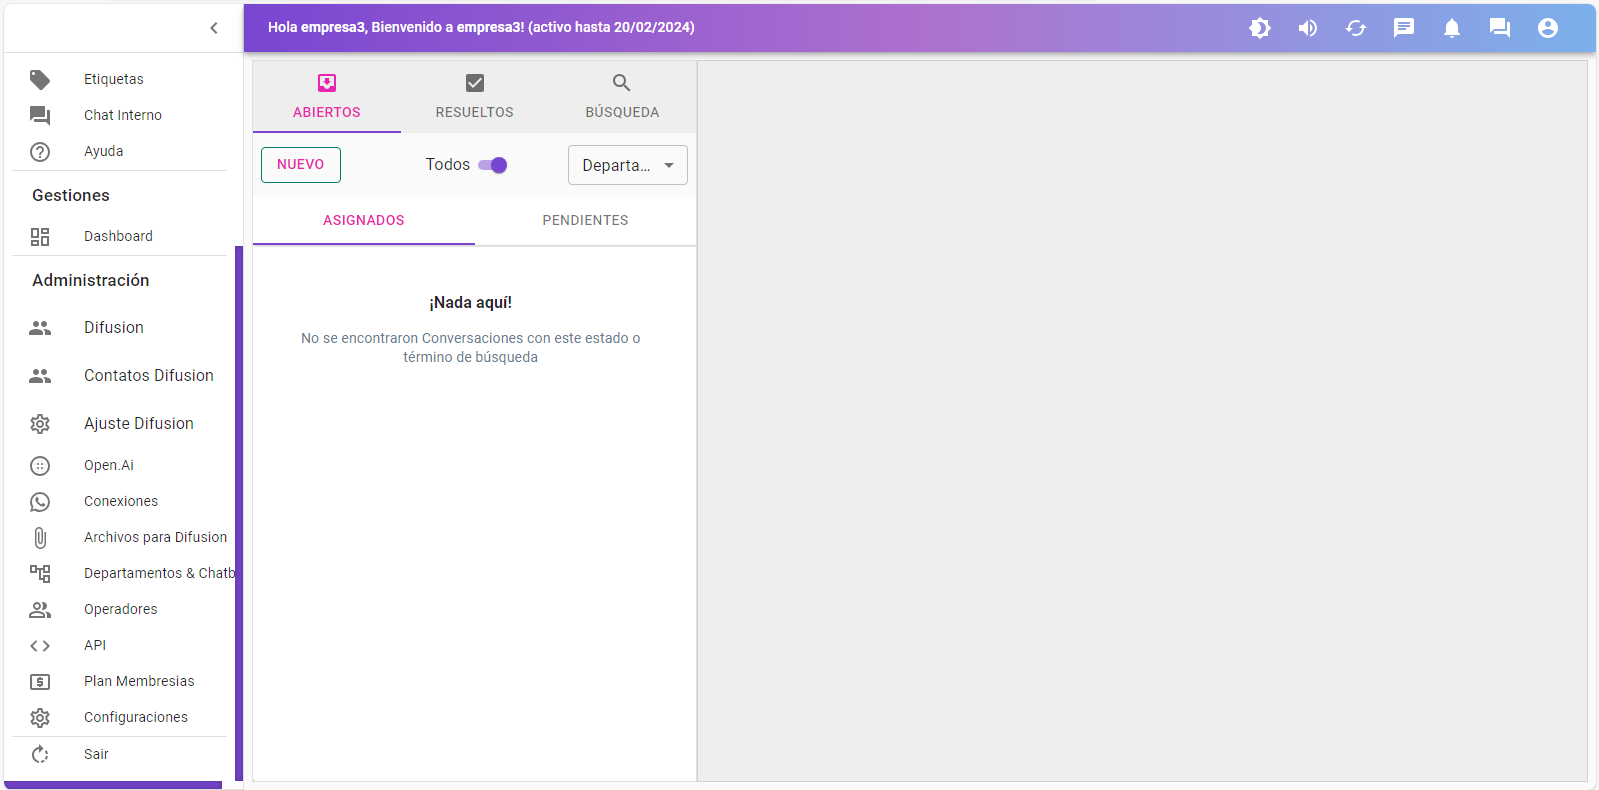
Click on the CONFIGURATIONS button
Inside the settings page, you will find the OPTIONS table
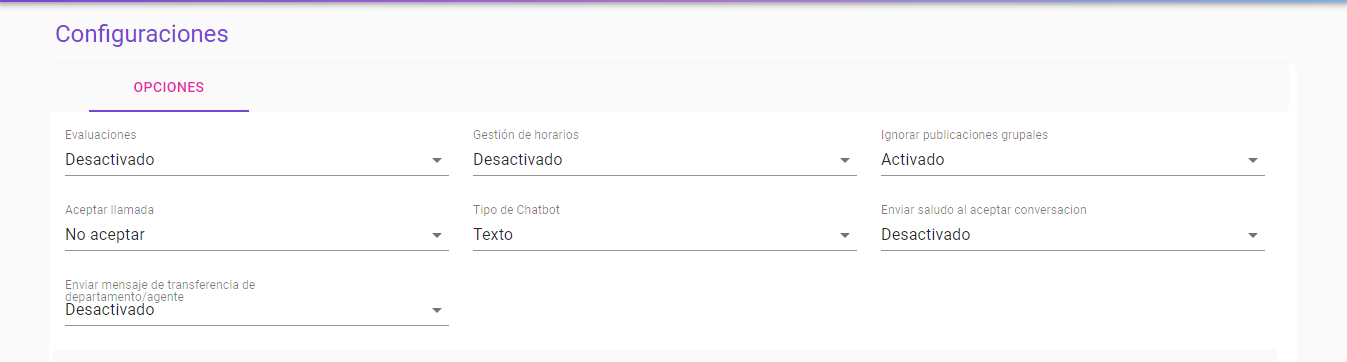
In the Options section, you will find a series of important configurations
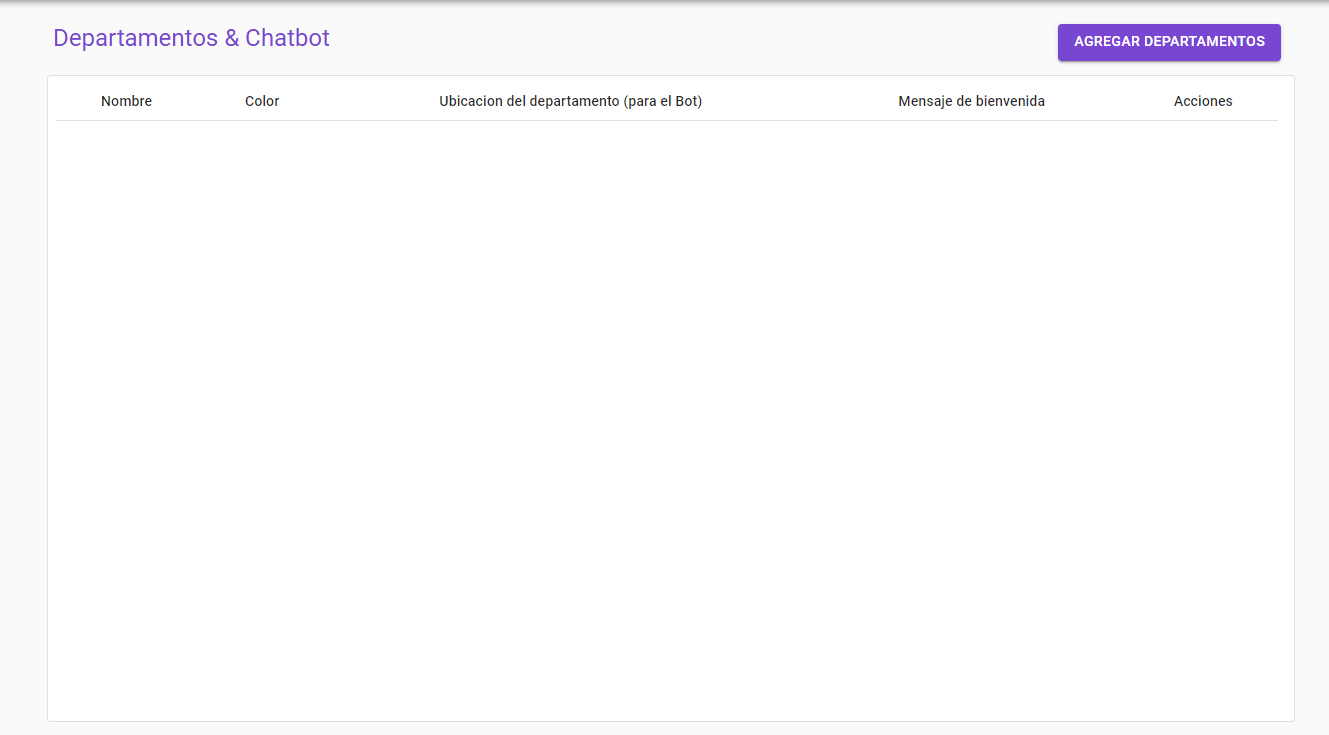
A Support Department
Creating a new department is a support line. It is important to create one as it allows directing customers to the correct operators/agents. It also enables assigning specific WhatsApp accounts to handle each department/queue.
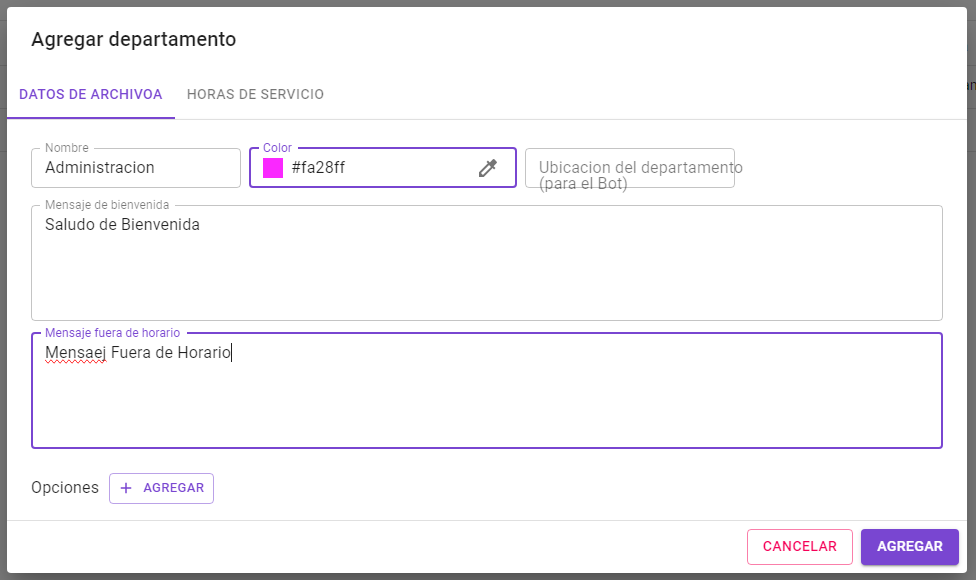
Click the ADD DEPARTMENT button in the top right corner.
A pop-up window will appear with options to create a new department. You must fill out these fields correctly.
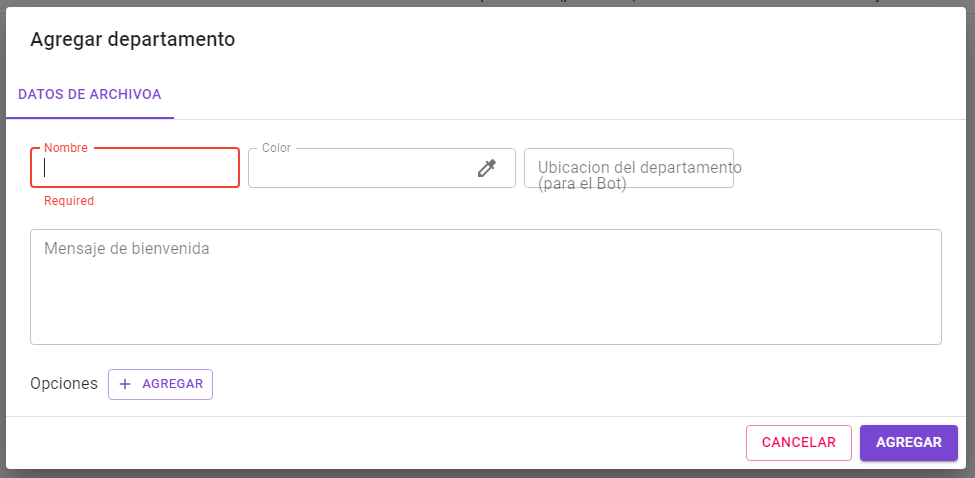
If you activated schedules by department, you can add opening and closing hours for each department separately.

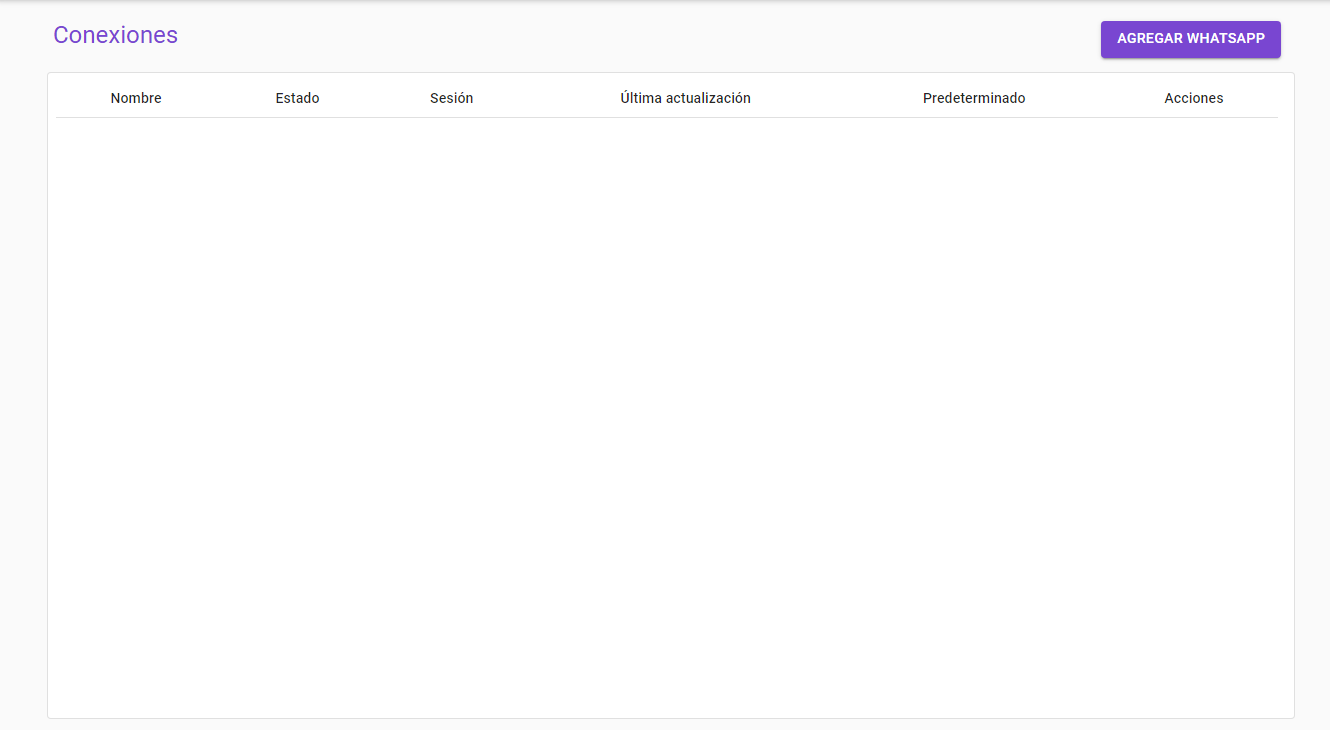
Register a WhatsApp Account
supports multiple WhatsApp accounts, and you must log in by scanning a QR code.
Click the Add WhatsApp button in the top right corner.
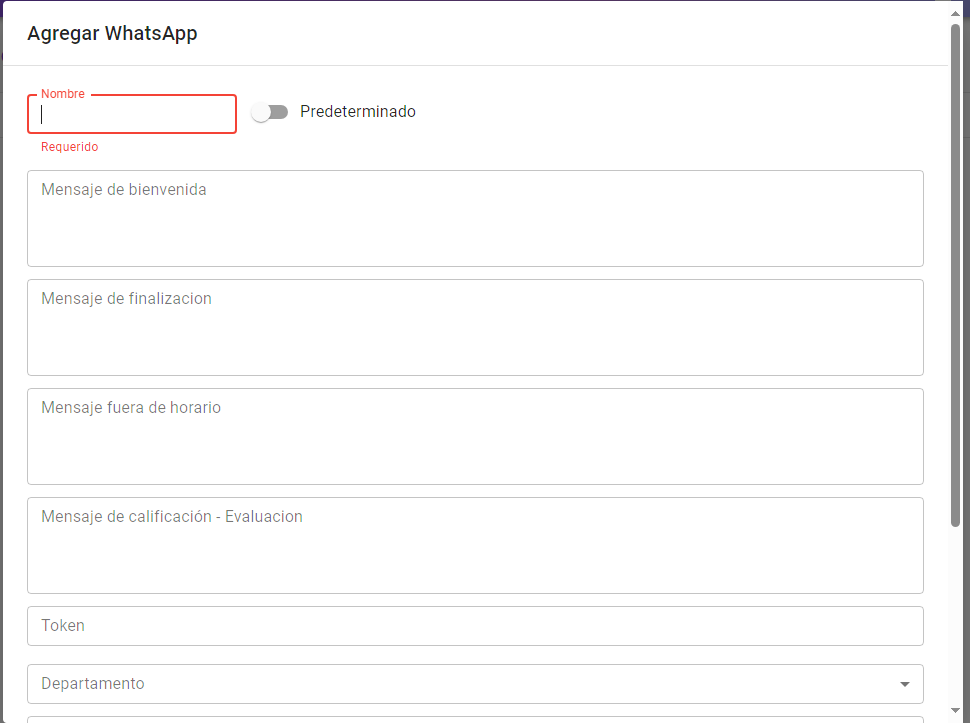
Fill out the information to create the auto-reply configuration.
- 1. Name: This name helps identify the WhatsApp account in other configurations and as a label in chats.
- 2. Default: Enabling this option will make this WhatsApp account the default in all configurations.
- 3. Welcome Message: This message is the first thing clients will receive when they contact your WhatsApp account automatically.
- 4. End Conversation Message: This message is automatically sent to the client when their conversation is resolved..
- 5. Out-of-Hours Message: This message will be sent to clients if the service hours configuration is active and set for each department, and this WhatsApp account is configured for that department.
- 6. Evaluation Message: Clients will receive this message if the evaluation configuration is enabled.
- 7. Token: The token is a key that authorizes external API usage with your WhatsApp account and the native API offor external implementations.
- 8. Department: Here you can add the departments you want this WhatsApp account to handle. A single WhatsApp account can handle multiple departments.
- 9. Prompt: Here you can add prompts for your OpenAI integration. Don’t worry, you can always return and add new prompts later.
- 10. Department Redirection: You can add redirection for conversations where the client stops responding or doesn’t select a department. This applies when automated bots are handling the conversation, allowing redirection to another department after a certain period of inactivity.
- 11. Redirection Time:Specify the time the bot should wait before redirecting the conversation to the selected department. Choose a number representing the minutes.
- 12. Save:Don’t forget to save your configuration.
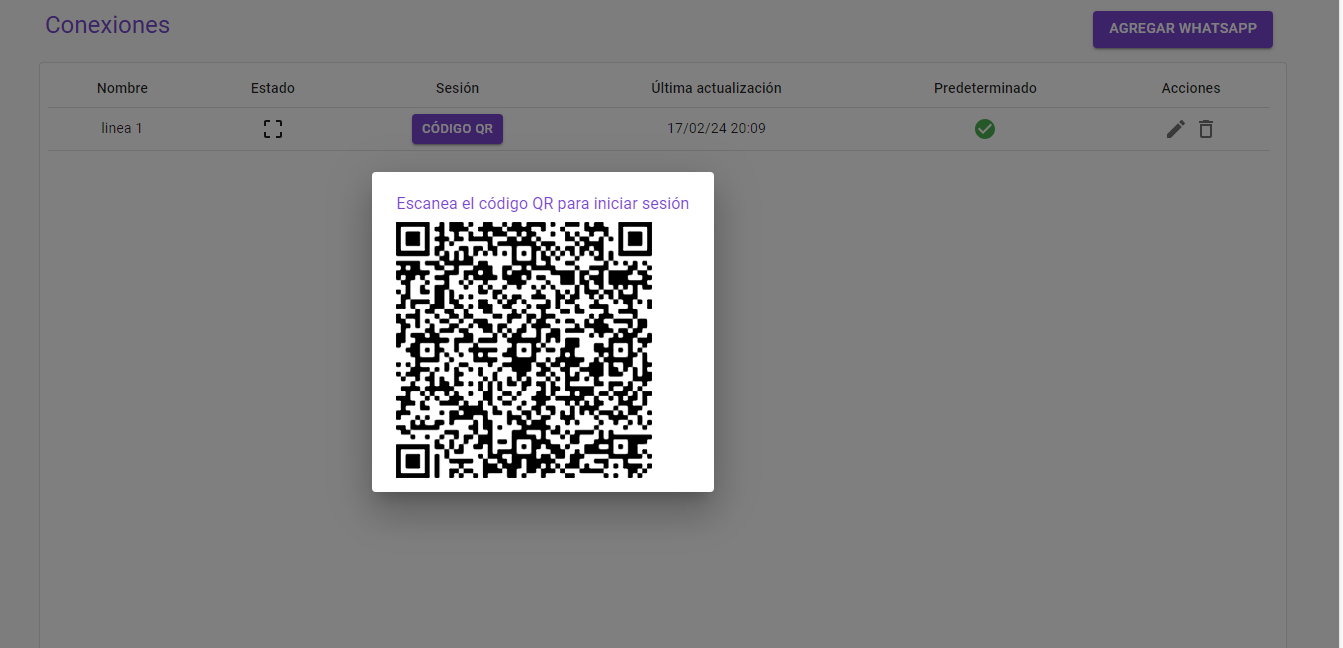
After completing and saving the configurations, click the QR Code button.
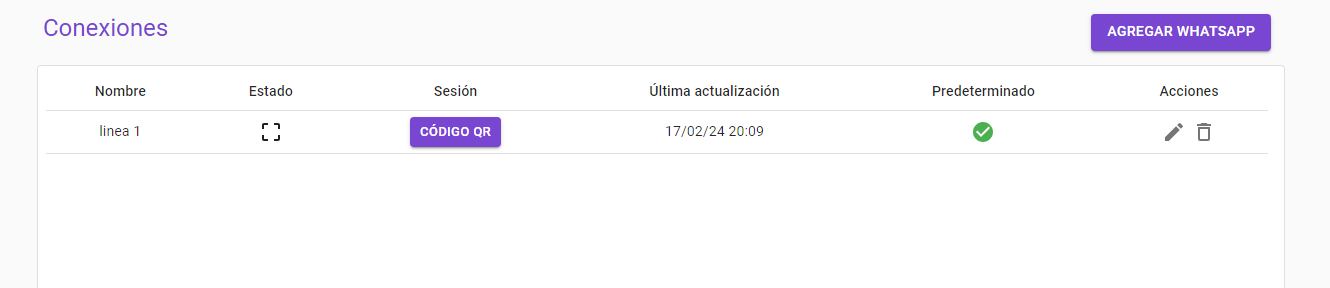
A QR Code window will appear, and you must scan it from your device within the WhatsApp application underSettings->Linked Devices->Link a Device->Scan it with your mobile device

Ajouter des Opérateurs
Les opérateurs représentent votre équipe de travail.
Menu latéral->Opérateurs->Ajouter un Utilisateur dans le coin supérieur droit.
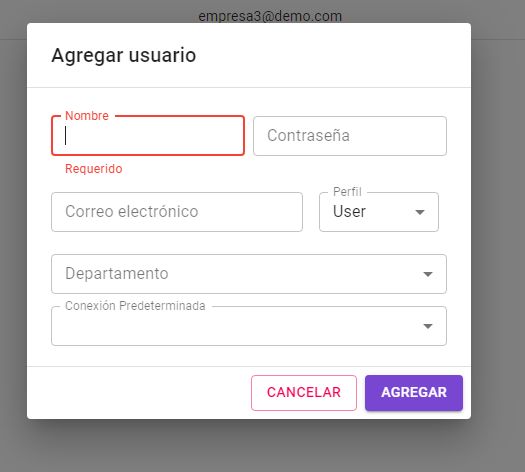
Utilisateur: Service client Admin: Privilèges d’administrateurAjouter des Étiquettes
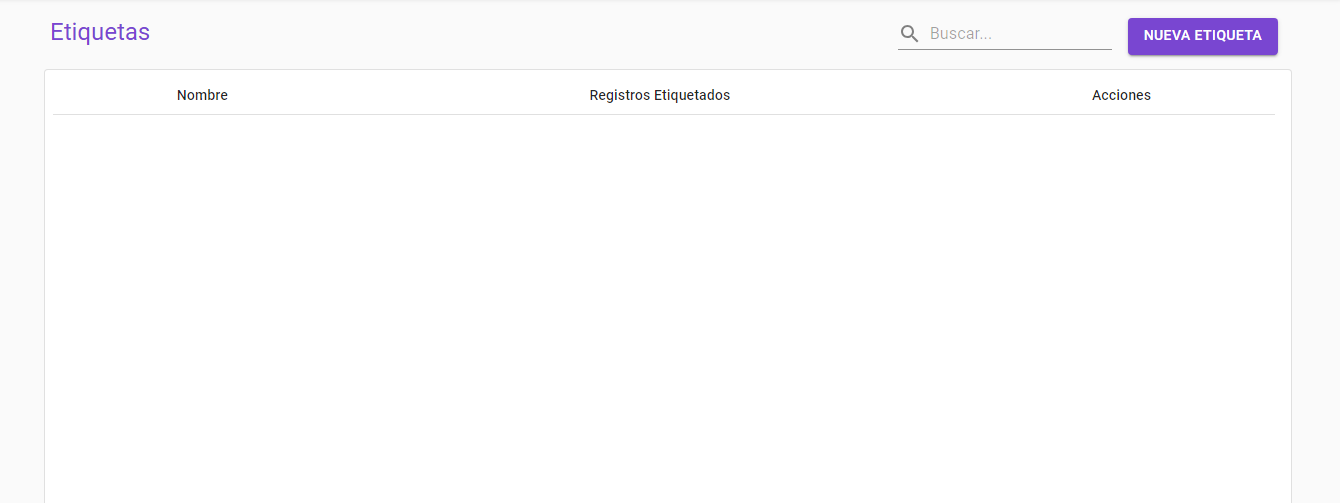
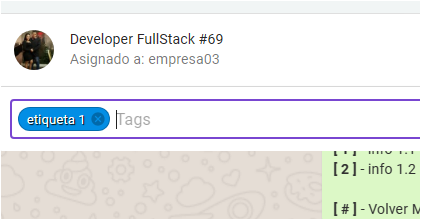
Les étiquettes sont un outil très utile pour segmenter les conversations et regrouper les utilisateurs afin de mieux contrôler et visualiser le flux des clients.
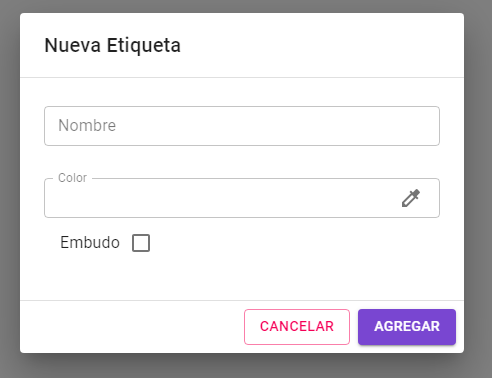
Appuyez sur le bouton NOUVELLE ÉTIQUETTE en haut à droite
Remplissez les champs
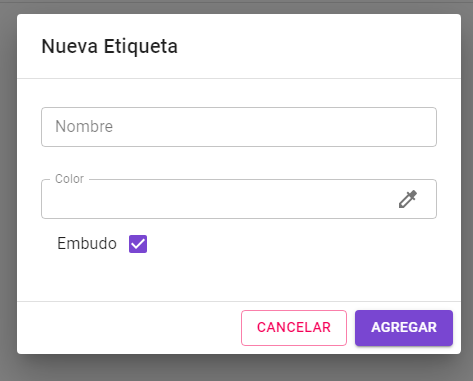
Ajouter des Étiquettes d’Entonnoir
Les étiquettes d’entonnoir ont une double fonction et se créent de la même manière que les étiquettes classiques pour les conversations.
- Pour créer une étiquette d’entonnoir, allez à Étiquettes dans le menu latéral gauche.
- Pour créer une étiquette d’entonnoir, appuyez sur le bouton NOUVELLE ÉTIQUETTE en haut à droite et remplissez les champs requis.
- 1. Nom : Nom affiché comme identifiant de l’étiquette pour l’associer à une conversation
- 2. Couleur :La couleur sert à différencier les étiquettes pour une gestion visuelle plus simple
- 3. Enregistrer l’Étiquette : N’oubliez pas d’enregistrer l’étiquette en cliquant sur le bouton Enregistrer
- Pour créer une étiquette d’entonnoir, appuyez sur le bouton en haut à droite et remplissez les champs requis.
Remplissez les champs
Remplissez les champs
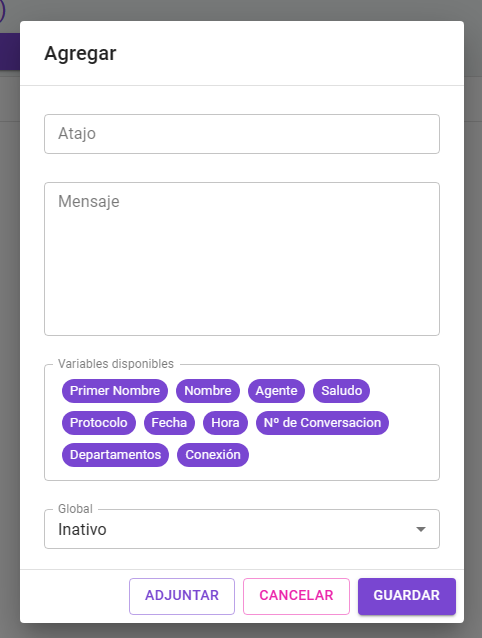
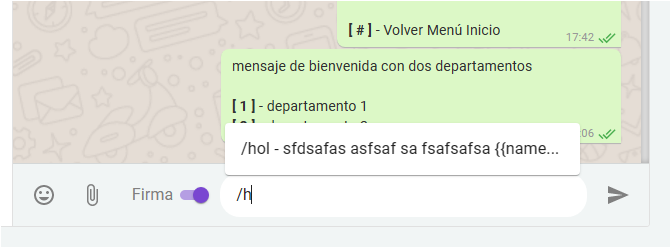
Réponses Rapides
Les réponses rapides permettent aux opérateurs de créer des réponses standardisées accessibles via des mots-clés, accélérant ainsi les interactions avec les clients (salutations, demandes d’informations, procédures, etc.).
Cliquez sur le bouton AJOUTER et entrez les informations
Pour l’utiliser, tapez la barre “/” suivie du mot-clé dans la boîte de texte du chat avec le client. Une liste de réponses rapides disponibles s’affichera.
Recharger les Abonnements
Pour recharger votre abonnement, contactez le service administratif de WaboTify
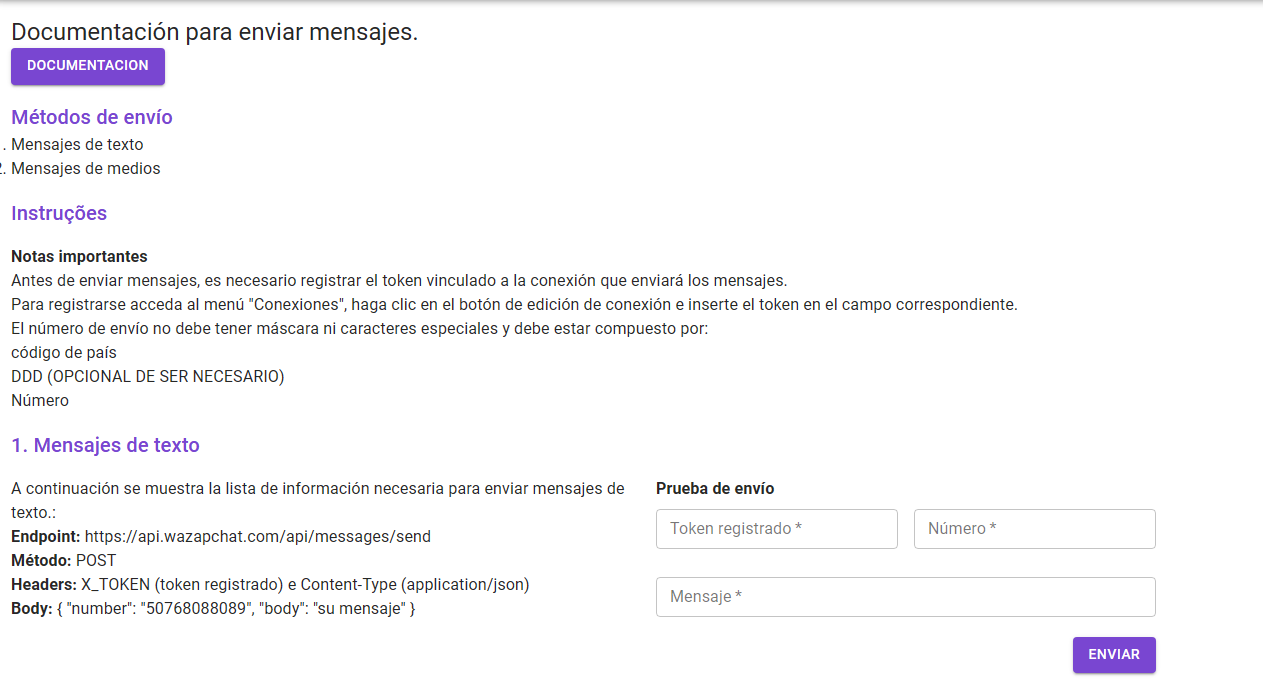
Rest API
Le module Rest API permet d’intégrer la fonction d’envoi de messages WhatsApp à d’autres systèmes via un point d’ancrage au format JSON, ce qui permet une utilisation flexible.
Implementation Examples
PHP
                    <?php
                    $number = '447455941979';
                    $body = 'your message';

                    $url = 'https://api2.wabotify.com/api/messages/send'; // API URL                    $token = 'Bearer 123456789'; // Registered Token
                    // Data to send in the request body                    $data = [
                        'number' => $number,
                        'body' => $body
                    ];

                    // Convert data to JSON format                    $postData = json_encode($data);

                    // Initialize a cURL request                    $cURL = curl_init($url);

                    // Set cURL options                    curl_setopt($cURL, CURLOPT_RETURNTRANSFER, true);
                    curl_setopt($cURL, CURLOPT_HTTPHEADER, [
                        'Authorization: ' . $token,
                        'Content-Type: application/json'
                    ]);
                    curl_setopt($cURL, CURLOPT_POST, true);
                    curl_setopt($cURL, CURLOPT_POSTFIELDS, $postData);

                    // Execute the cURL request and obtain the response                    $response = curl_exec($cURL);

                    // Check for errors in the cURL request                    if(curl_errno($cURL)){
                        echo 'Error: ' . curl_error($cURL);
                    }

                    // Close the cURL request                    curl_close($cURL);

                    // Print the response                    echo $response;
                    ?>
json
                    <
                    {
                      "number": "447455941979",
                      "body": "your message",
                      "token": "Bearer 123456789"
                    }
                    >
React (Javascript):
                    <

                    import axios from 'axios';

                    const sendMessage = async () => {
                      const number = '447455941979';
                      const body = 'your message';
                      const token = 'Bearer 123456789';

                      try {
                        const response = await axios.post(
                          'https://api2.wabotify.com/api/messages/send',
                          { number, body, token },
                          { headers: { 'Content-Type': 'application/json' } }
                        );
                        console.log(response.data);
                      } catch (error) {
                        console.error('Error:', error);
                      }
                    };

                    sendMessage();
                    >
Python:
                    <

                    import requests

                    url = 'https://api2.wabotify.com/api/messages/send'
                    token = 'Bearer 123456789'
                    number = '447455941979'
                    body = 'your message'

                    data = {
                        'number': number,
                        'body': body
                    }

                    headers = {
                        'Authorization': token,
                        'Content-Type': 'application/json'
                    }

                    response = requests.post(url, json=data, headers=headers)
                    print(response.json())
                    >
Ruby:
                    <

                    require 'uri'
                    require 'net/http'
                    require 'openssl'
                    require 'json'

                    url = URI("https://api2.wabotify.com/api/messages/send")

                    http = Net::HTTP.new(url.host, url.port)
                    http.use_ssl = true
                    http.verify_mode = OpenSSL::SSL::VERIFY_NONE

                    token = 'Bearer 123456789'
                    number = '447455941979'
                    body = 'your message'

                    data = {
                      'number' => number,
                      'body' => body
                    }

                    request = Net::HTTP::Post.new(url)
                    request["Authorization"] = token
                    request["Content-Type"] = "application/json"
                    request.body = JSON.dump(data)

                    response = http.request(request)
                    puts response.read_body
                    >
Dart:
                    <

                    import 'dart:convert';
                    import 'package:http/http.dart' as http;

                    void main() async {
                      final String url = 'https://api2.wabotify.com/api/messages/send';
                      final String token = 'Bearer 123456789';
                      final String number = '447455941979';
                      final String body = 'WaboTify';

                      final Map data = {
                        'number': number,
                        'body': body,
                      };

                      final headers = {
                        'Authorization': token,
                        'Content-Type': 'application/json',
                      };

                      final response = await http.post(
                        Uri.parse(url),
                        headers: headers,
                        body: jsonEncode(data),
                      );

                      print(response.body);
                    }
                    >
Java (con OkHttp):
                    <

                    import okhttp3.*;

                    public class Example {
                        public static void main(String[] args) {
                            OkHttpClient client = new OkHttpClient();

                            String number = "447455941979";
                            String body = "your message";
                            String token = "Bearer 123456789";

                            MediaType mediaType = MediaType.parse("application/json");
                            RequestBody requestBody = RequestBody.create(mediaType, "{\"number\":\"" + number + "\",\"body\":\"" + body + "\"}");

                            Request request = new Request.Builder()
                                    .url("https://api2.wabotify.com/api/messages/send")
                                    .post(requestBody)
                                    .addHeader("Authorization", token)
                                    .addHeader("Content-Type", "application/json")
                                    .build();

                            try {
                                Response response = client.newCall(request).execute();
                                System.out.println(response.body().string());
                            } catch (Exception e) {
                                e.printStackTrace();
                            }
                        }
                    }
                    >
C# (con HttpClient):
                    <

                    using System;
                    using System.Net.Http;
                    using System.Text;
                    using System.Threading.Tasks;

                    class Program
                    {
                        static async Task Main(string[] args)
                        {
                            string number = "447455941979";
                            string body = "your message";
                            string token = "Bearer 123456789";

                            var data = new { number, body };
                            var jsonData = Newtonsoft.Json.JsonConvert.SerializeObject(data);
                            var content = new StringContent(jsonData, Encoding.UTF8, "application/json");

                            using var client = new HttpClient();
                            client.DefaultRequestHeaders.Add("Authorization", token);

                            var response = await client.PostAsync("https://api2.wabotify.com/api/messages/send", content);
                            var responseContent = await response.Content.ReadAsStringAsync();

                            Console.WriteLine(responseContent);
                        }
                    }
                    >
Go:
                    <

                    package main

                    import (
                        "bytes"
                        "net/http"
                    )

                    func main() {
                        number := "447455941979"
                        body := "your messagesu mensaje"
                        token := "Bearer 123456789"

                        data := []byte(`{"number":"` + number + `","body":"` + body + `"}`)
                        req, err := http.NewRequest("POST", "https://api2.wabotify.com/api/messages/send", bytes.NewBuffer(data))
                        req.Header.Set("Authorization", token)
                        req.Header.Set("Content-Type", "application/json")

                        client := &http.Client{}
                        resp, err := client.Do(req)
                        if err != nil {
                            panic(err)
                        }
                        defer resp.Body.Close()

                        // Leer la respuesta
                        // body, _ := ioutil.ReadAll(resp.Body)
                        // fmt.Println(string(body))
                    }
                    >
Swift (para iOS con URLSession):
                    <

                    import Foundation

                    func sendWhatsAppMessage() {
                        let number = "447455941979"
                        let body = "your messagesu mensaje"
                        let token = "Bearer 123456789"

                        let url = URL(string: "https://api2.wabotify.com/api/messages/send")!
                        var request = URLRequest(url: url)
                        request.httpMethod = "POST"
                        request.addValue("application/json", forHTTPHeaderField: "Content-Type")
                        request.addValue(token, forHTTPHeaderField: "Authorization")

                        let parameters: [String: Any] = [
                            "number": number,
                            "body": body
                        ]
                        request.httpBody = try? JSONSerialization.data(withJSONObject: parameters)

                        let task = URLSession.shared.dataTask(with: request) { data, response, error in
                            guard let data = data, error == nil else {
                                print(error?.localizedDescription ?? "No data")
                                return
                            }

                            if let httpResponse = response as? HTTPURLResponse {
                                print("Status code: \(httpResponse.statusCode)")
                            }

                            if let responseString = String(data: data, encoding: .utf8) {
                                print("Response data: \(responseString)")
                            }
                        }
                        task.resume()
                    }

                    sendWhatsAppMessage()
                    >
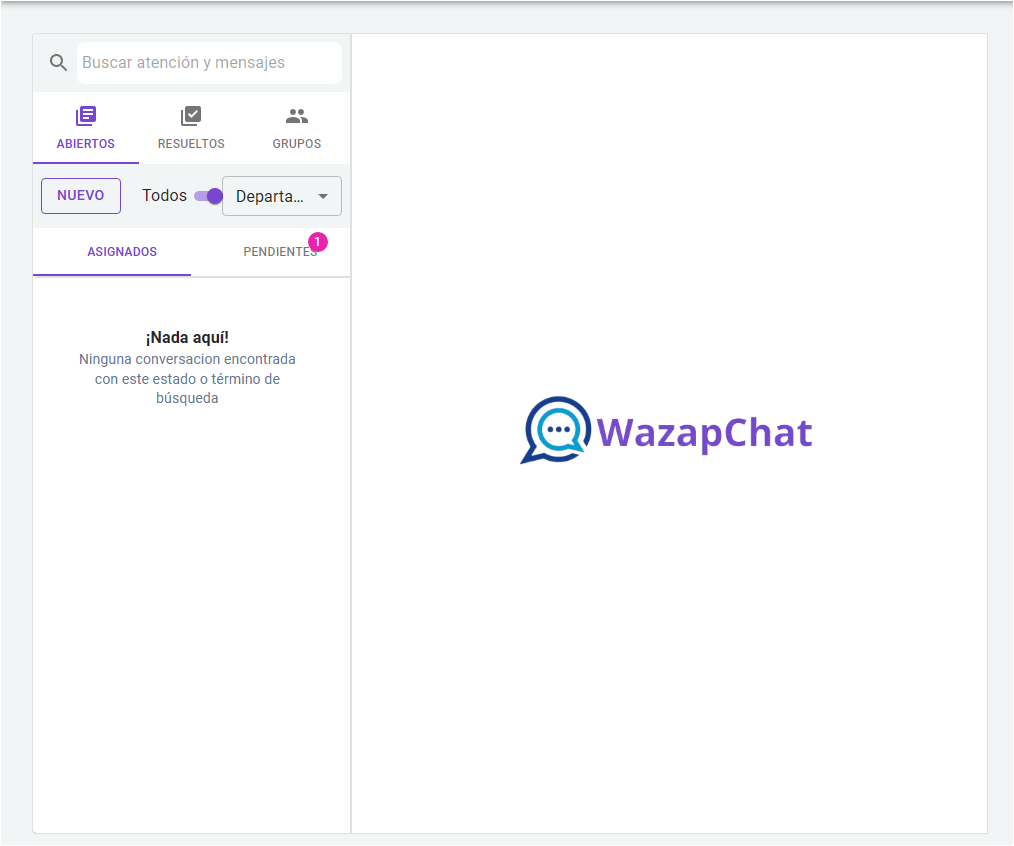
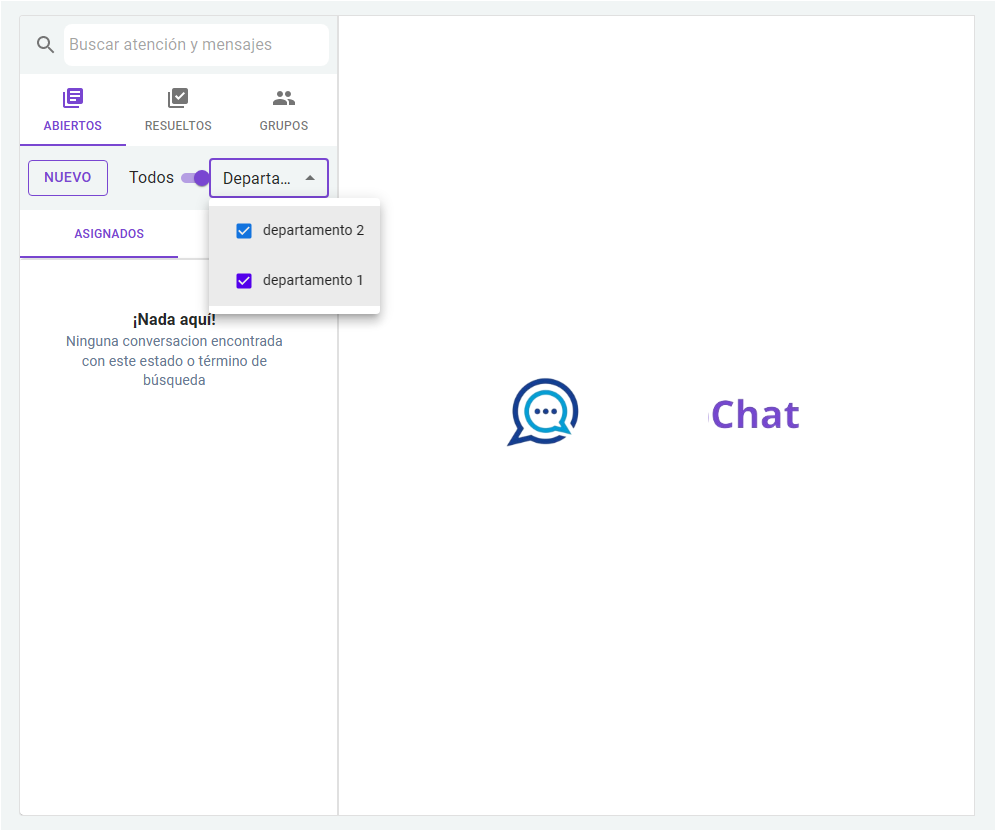
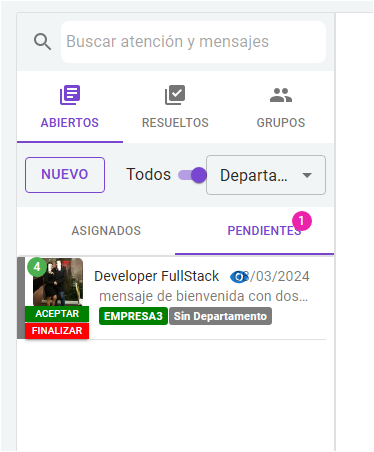
Live Chat
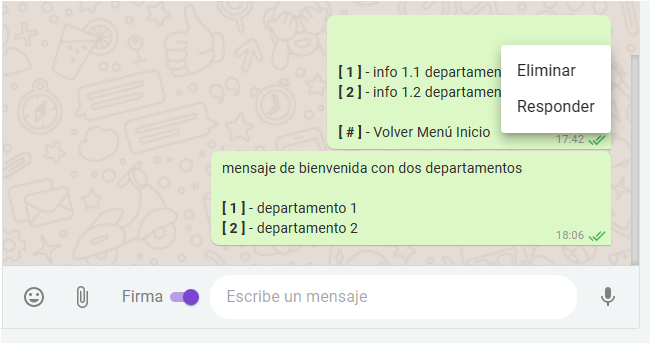
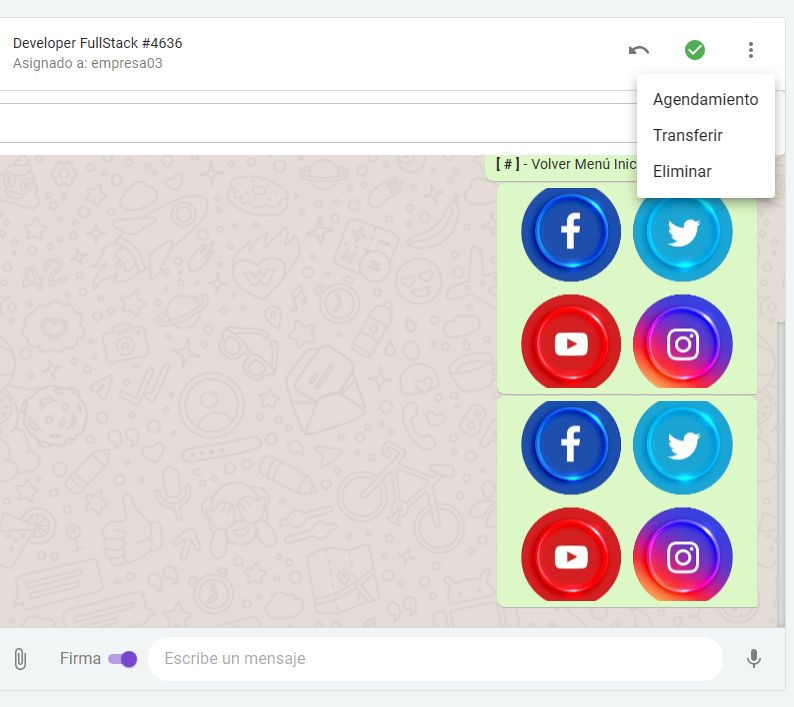
The live chat module is where customer conversations are managed and includes multiple tools that simplify client interactions. Below, we detail the various tools.
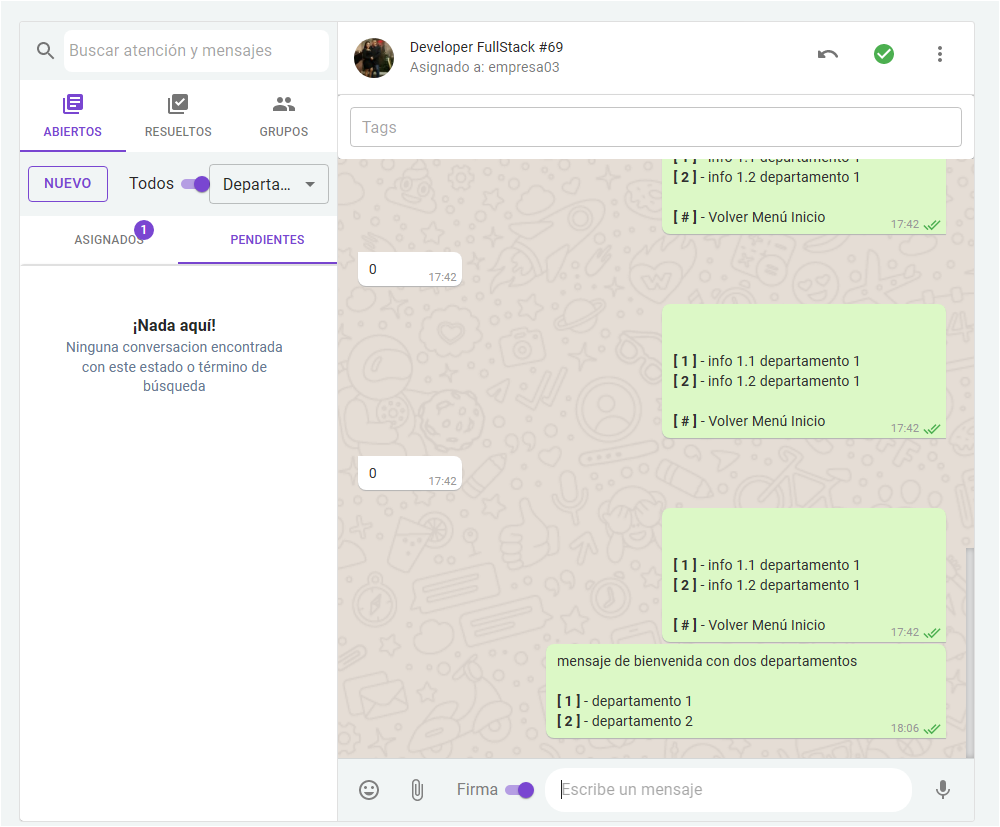
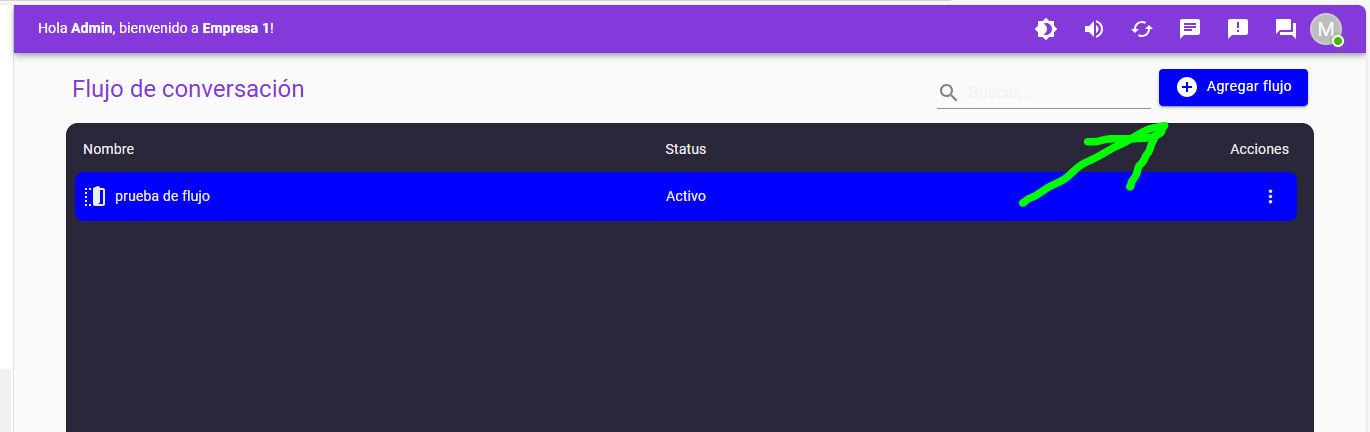
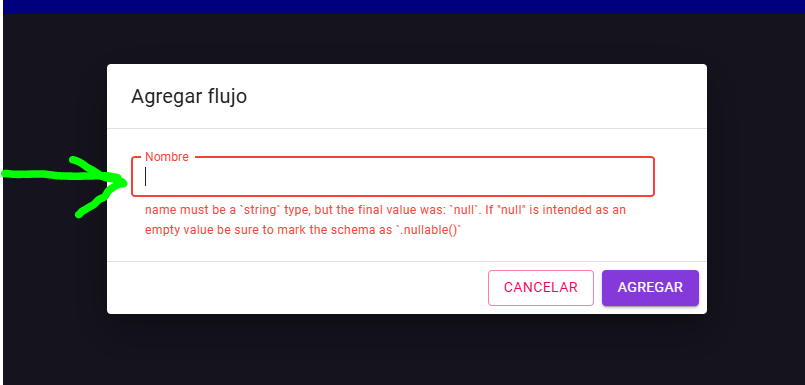
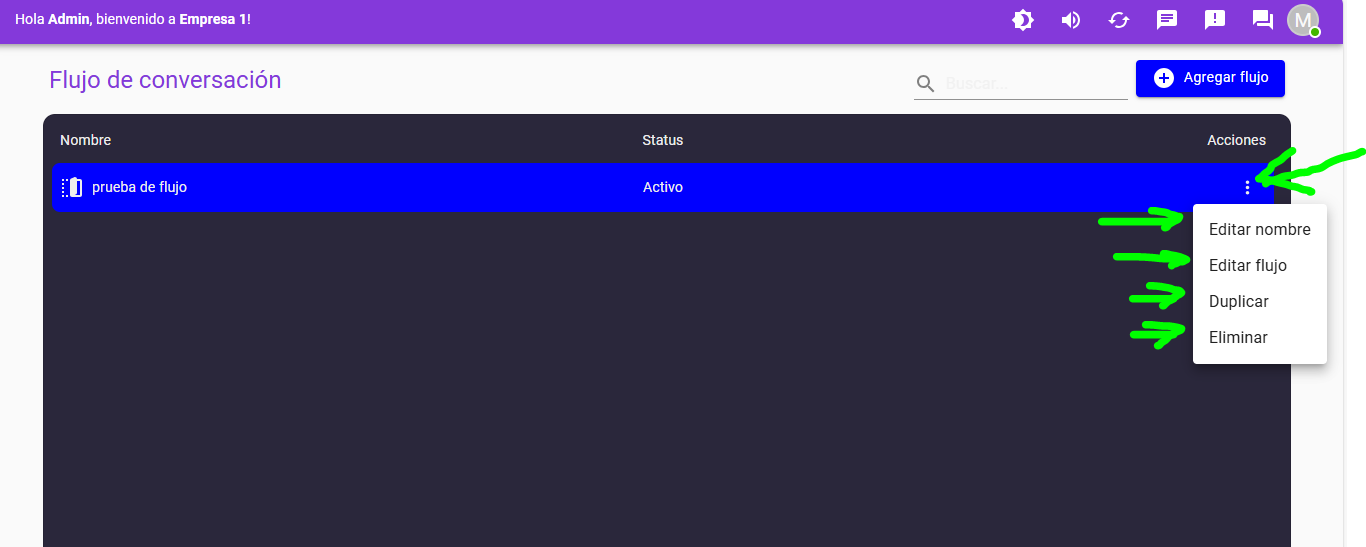
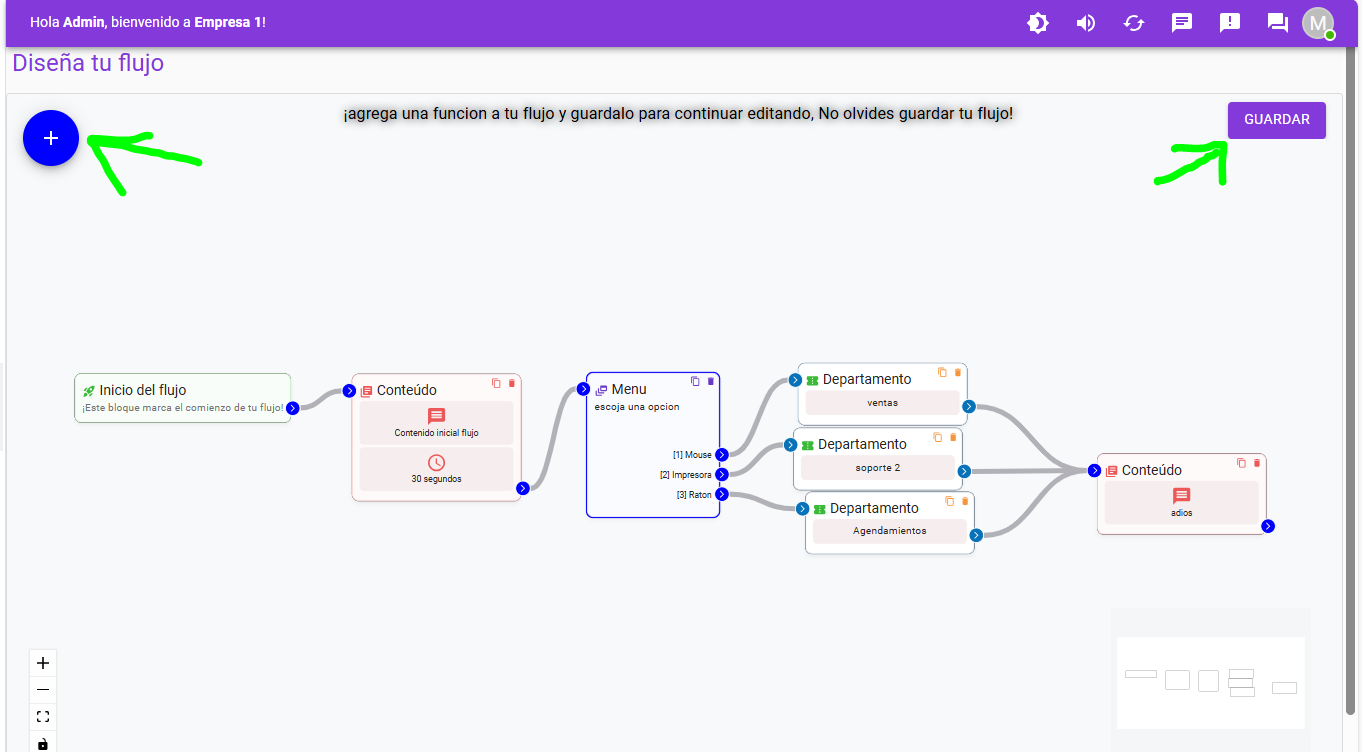
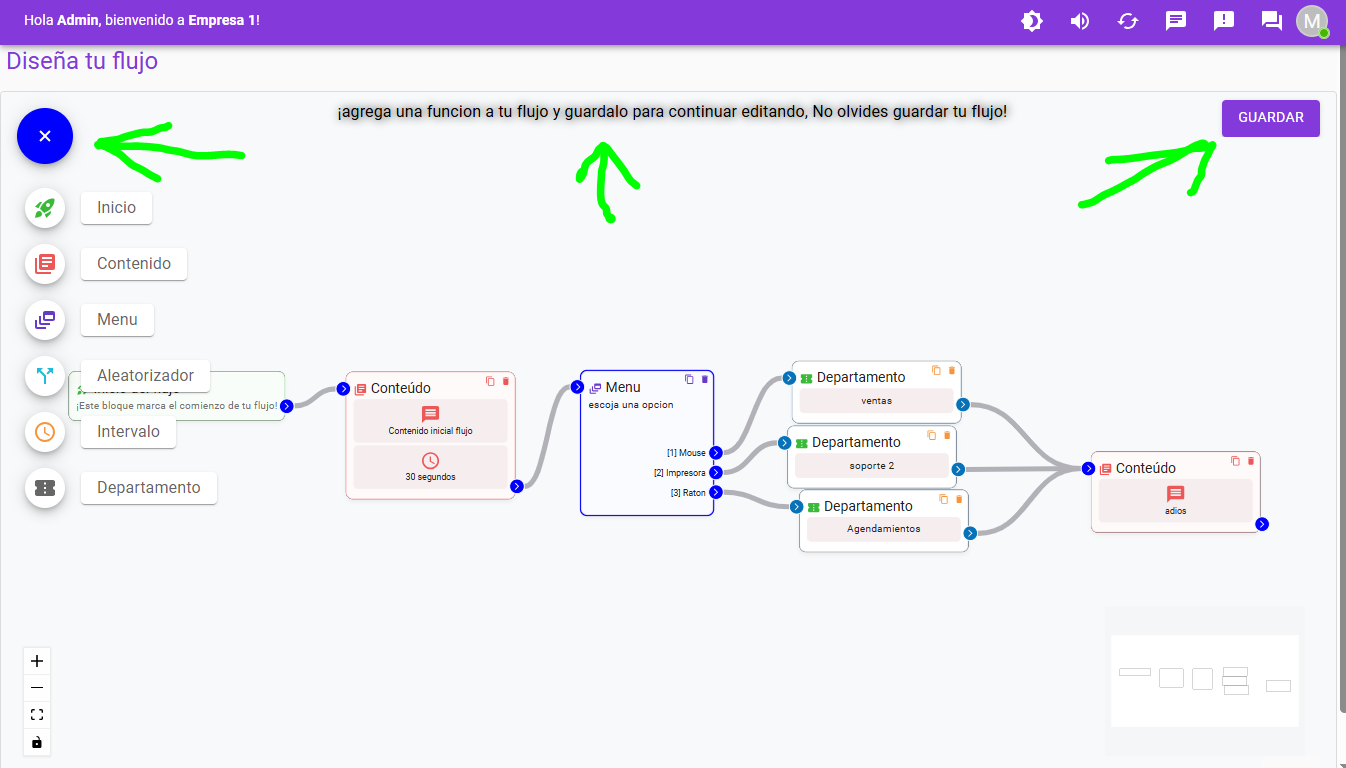
Auto-Response Bot
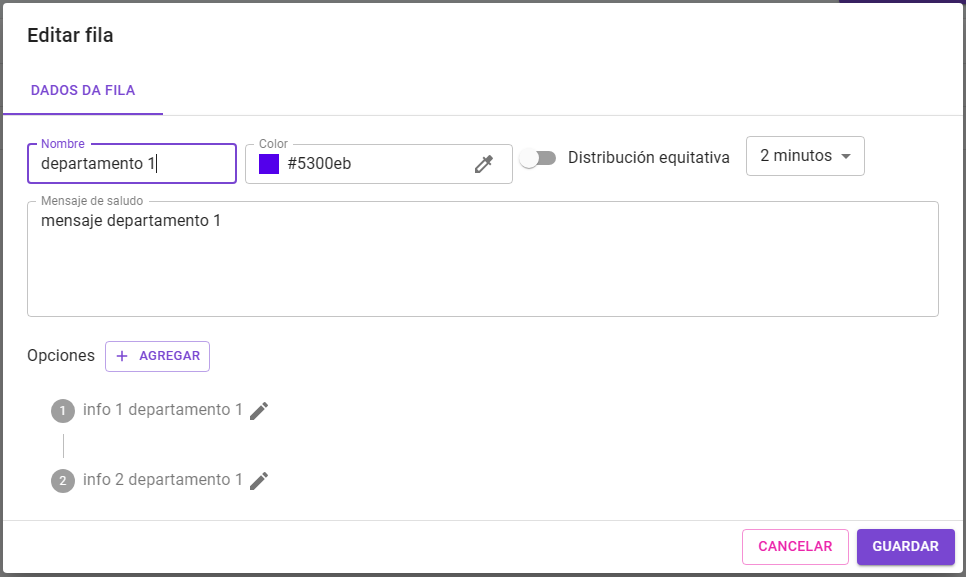
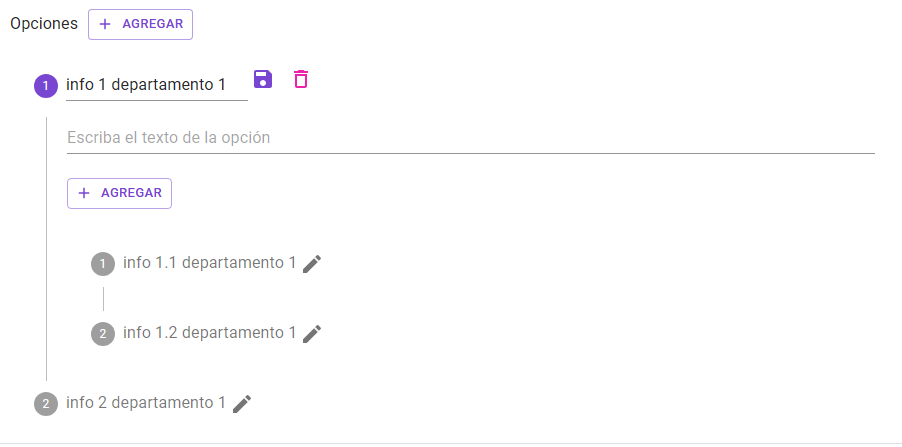
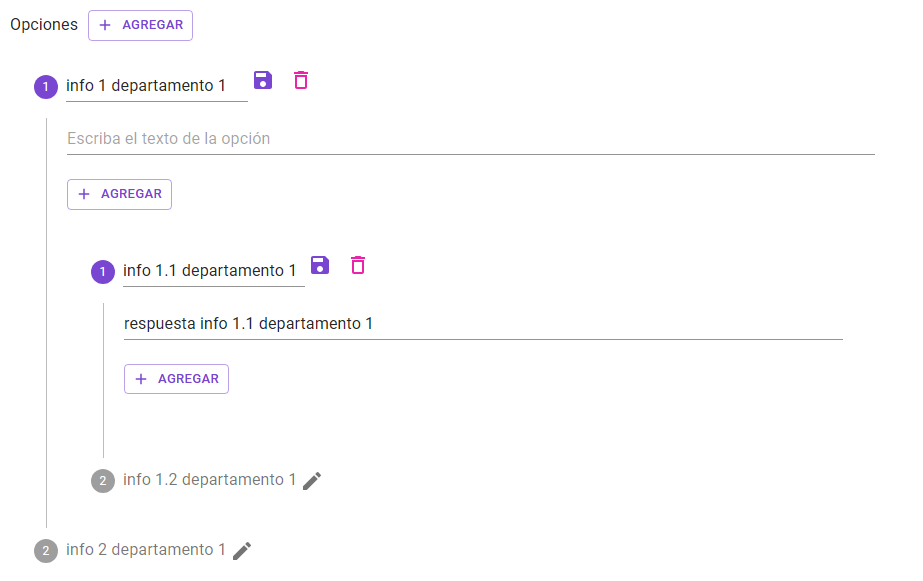

Structure Example
                    .
                    ├── Level 1 Option 1 with no response                    │
                    │ ├── Level 2 Option 1 with no response                    │ │
                    │ │ ├── Level 3 Option 1 with response                    │ │ │ └── Level 3 Option 1 Response                    │ │ │
                    │ │ └── Level 3 Option 2 with response                    │ │    └── Level 3 Option 2 Response                    │ │
                    │ └── Level 2 Option 2 with no response                    │     │
                    │     └─── Level 3 Option 1 with response                    │      └── Level 3 Option 1 Response                    │
                    │
                    └── Level 1 Option 2 with response                        └── Level 1 Option 2 Response
Reminders

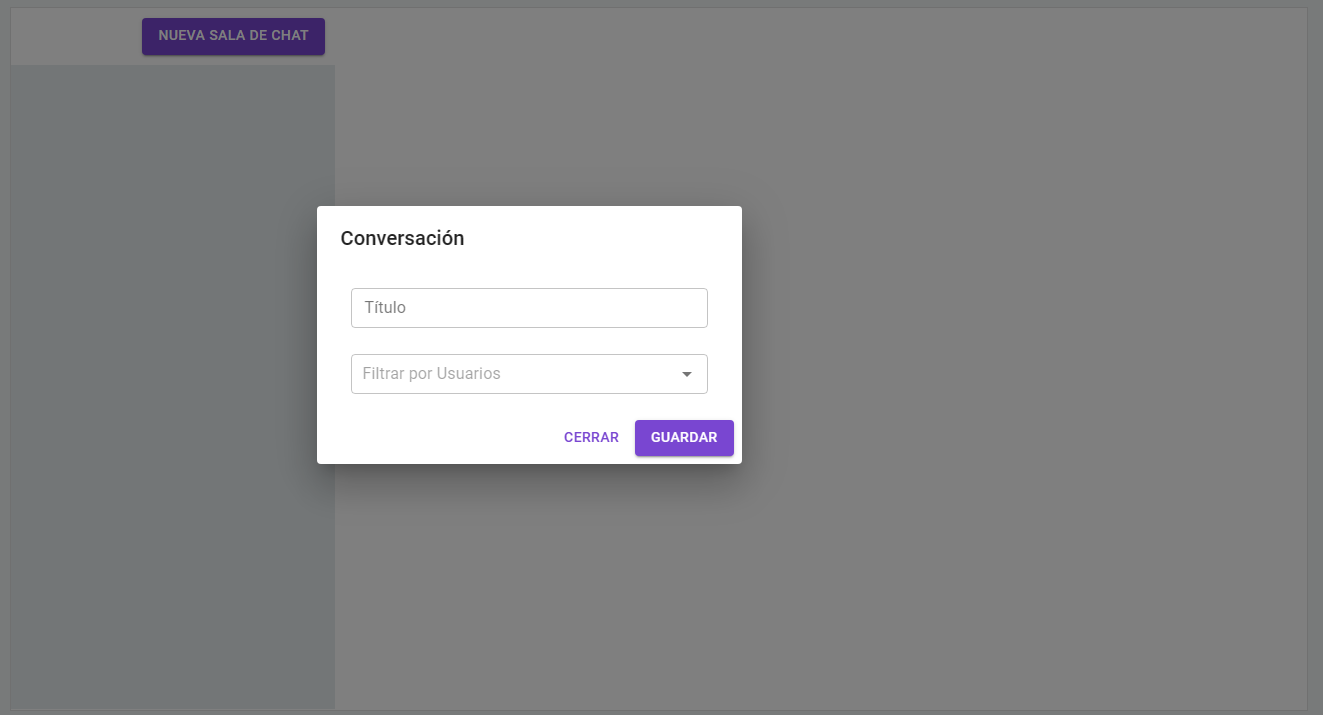
Internal Chat
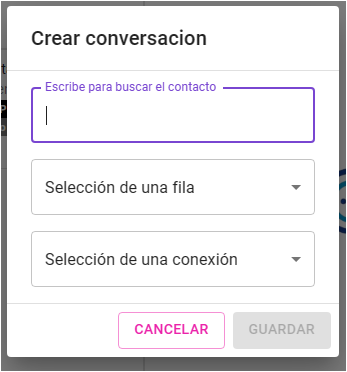
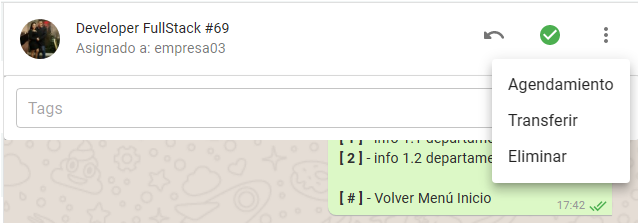
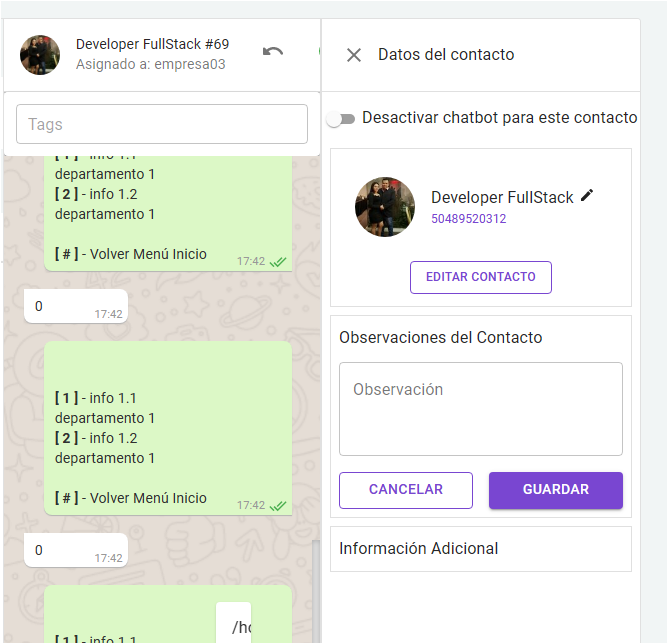
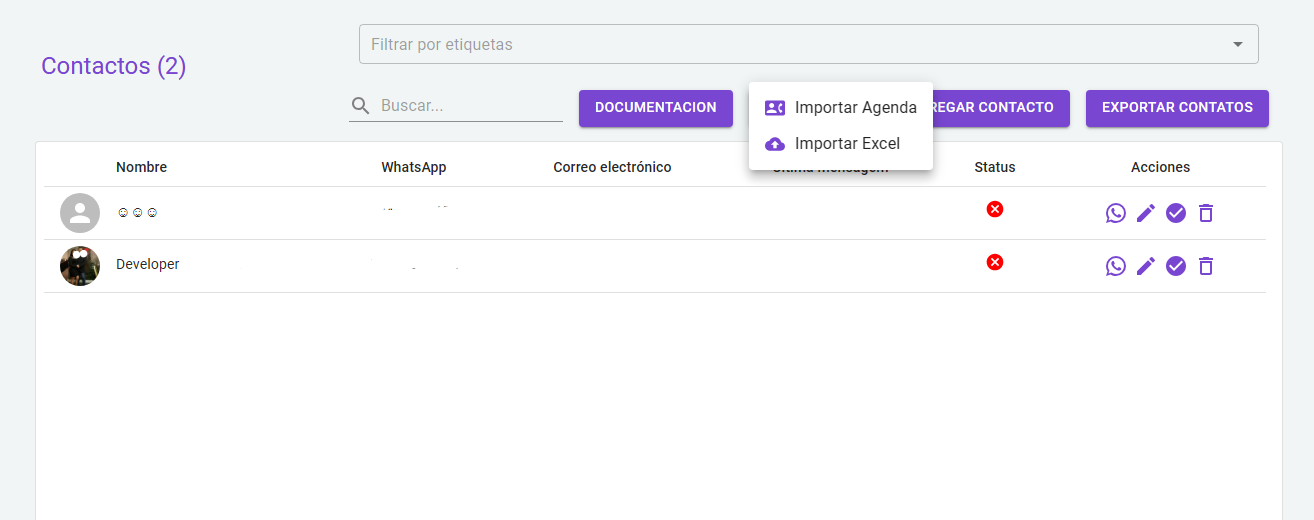
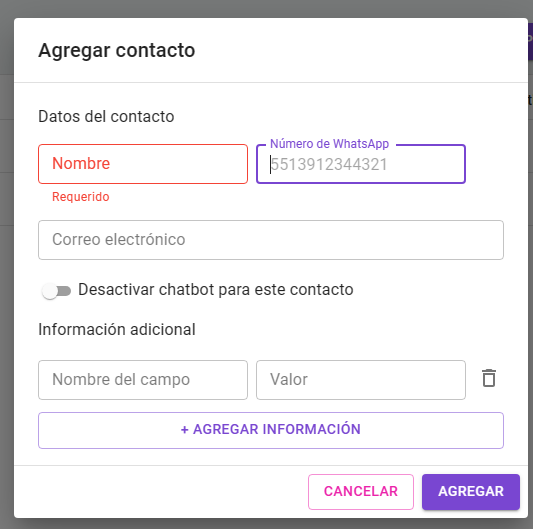
Contact Management
Help Center "Tutorials"
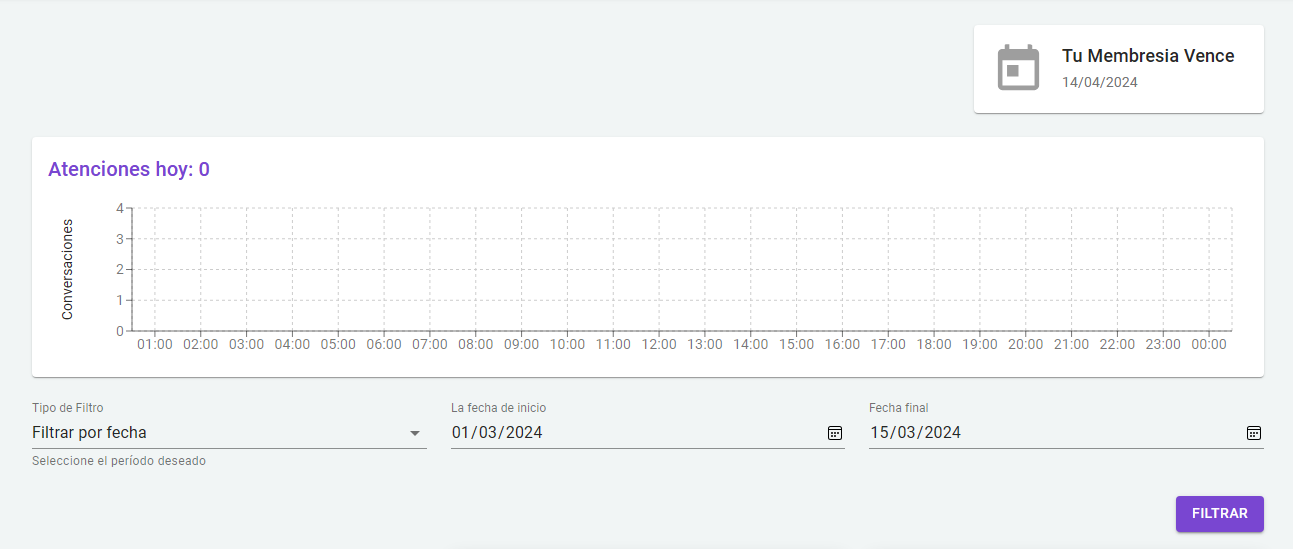
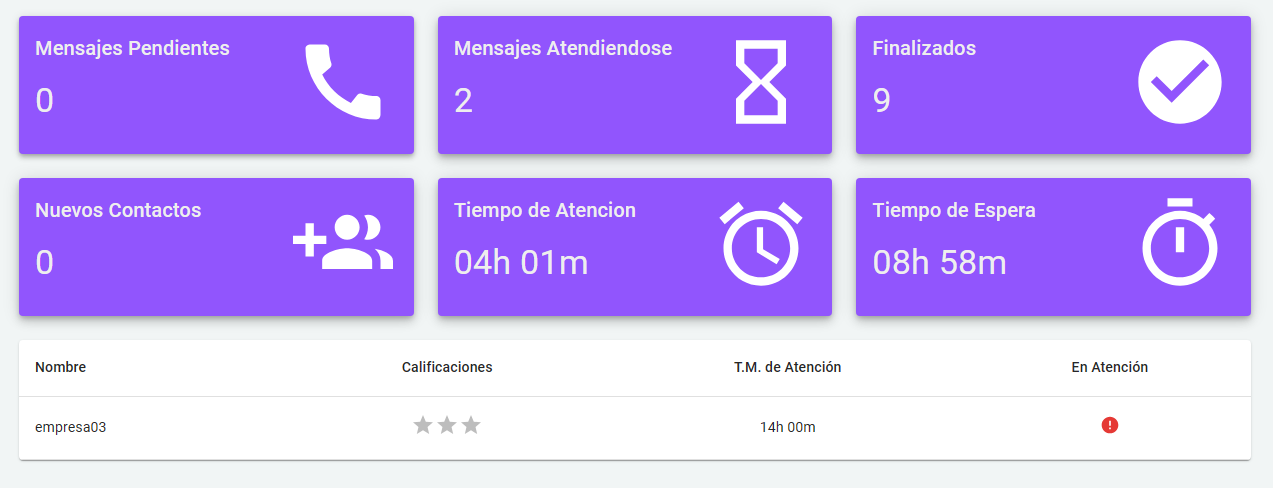
Dashboard
Announcement Center
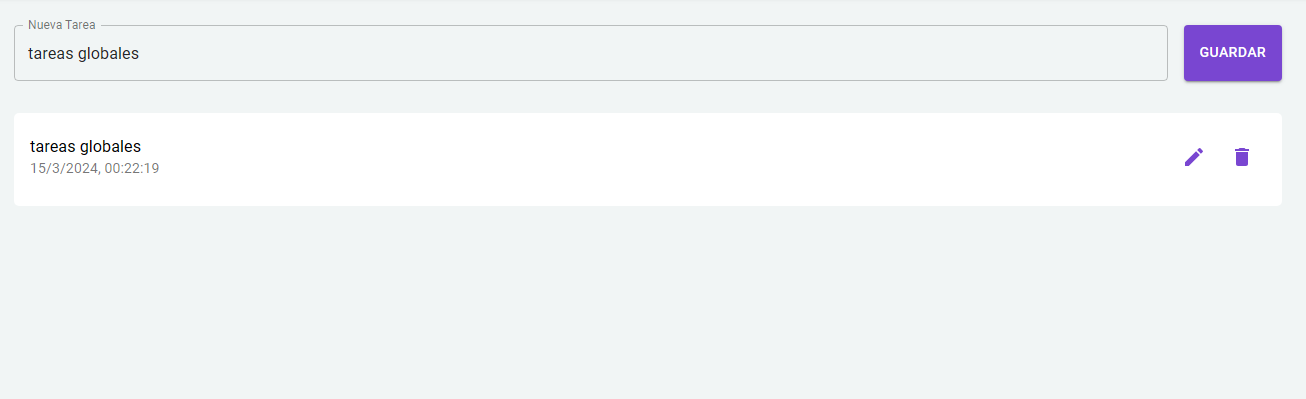
Tasks
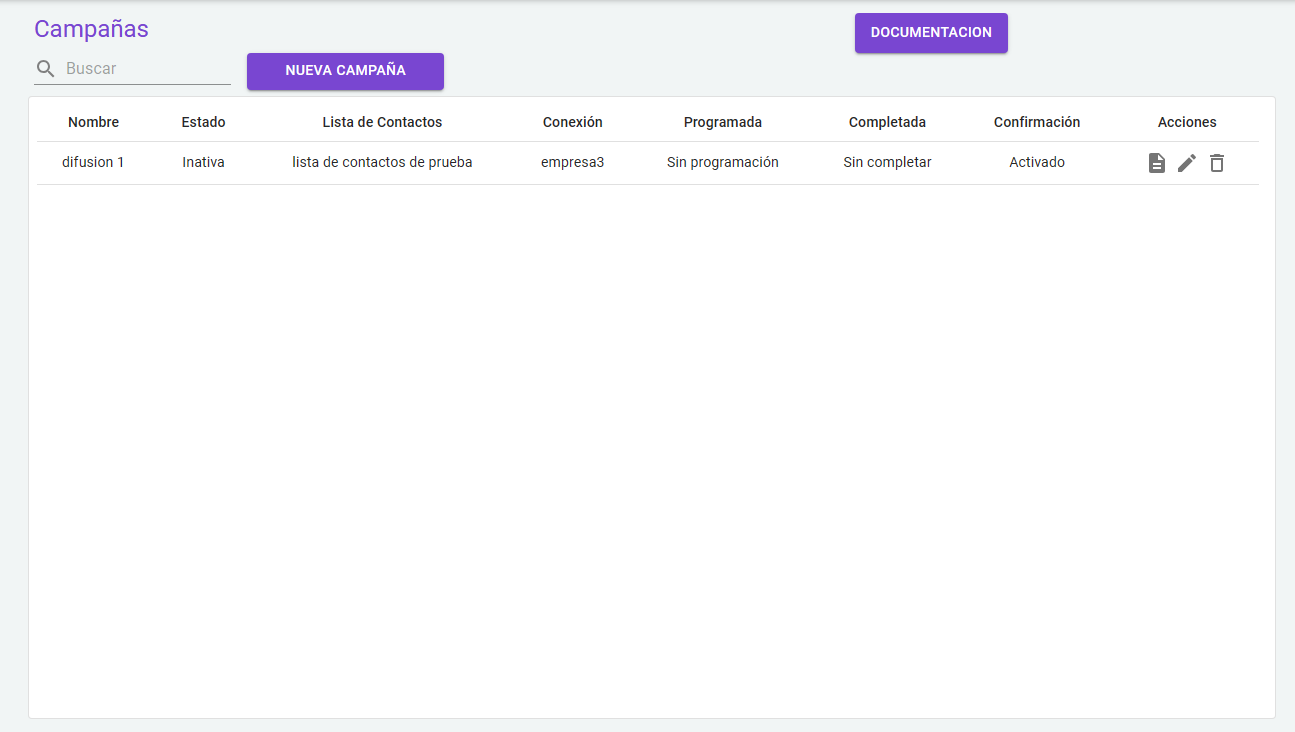
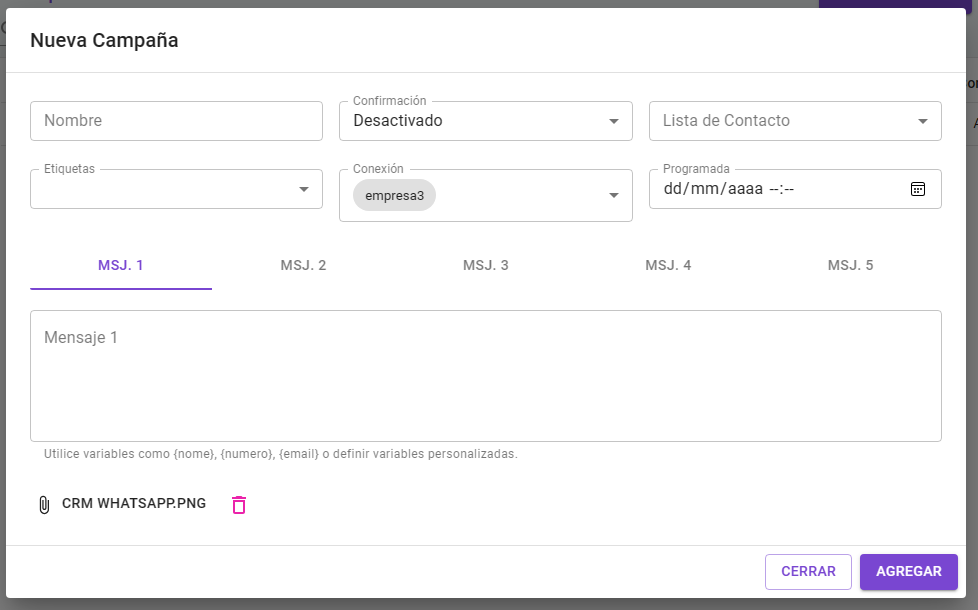
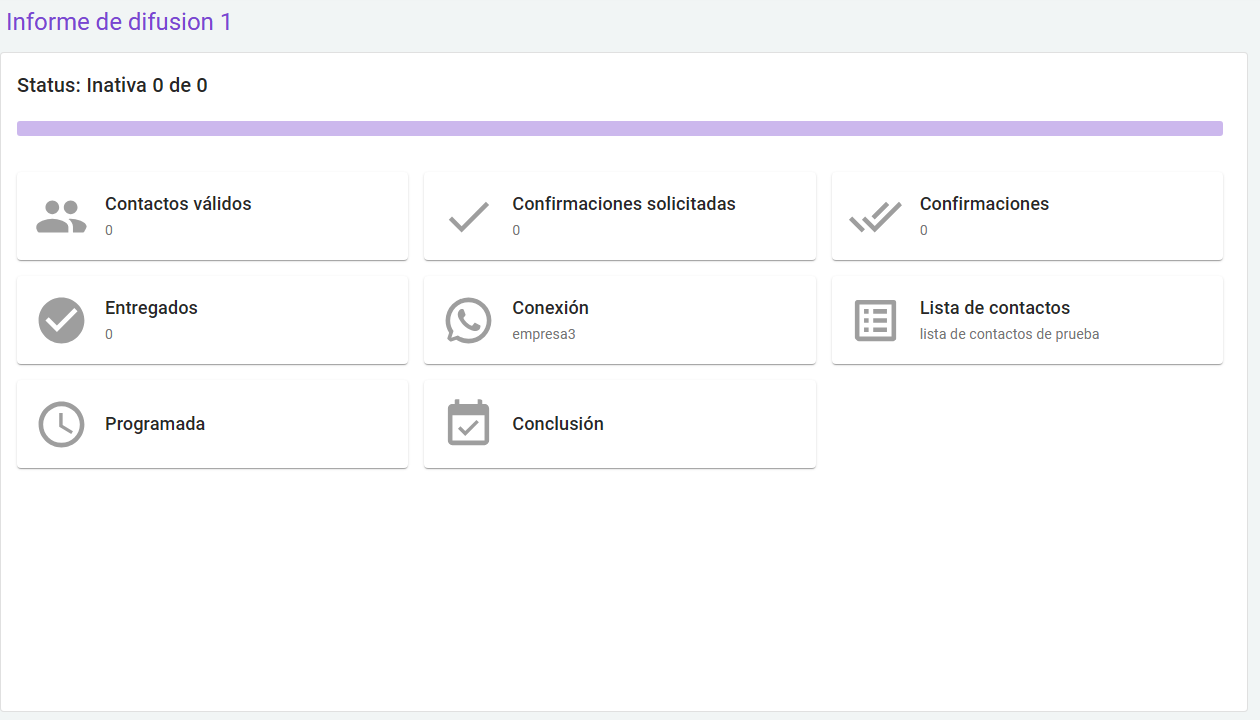
WhatsApp Campaigns List
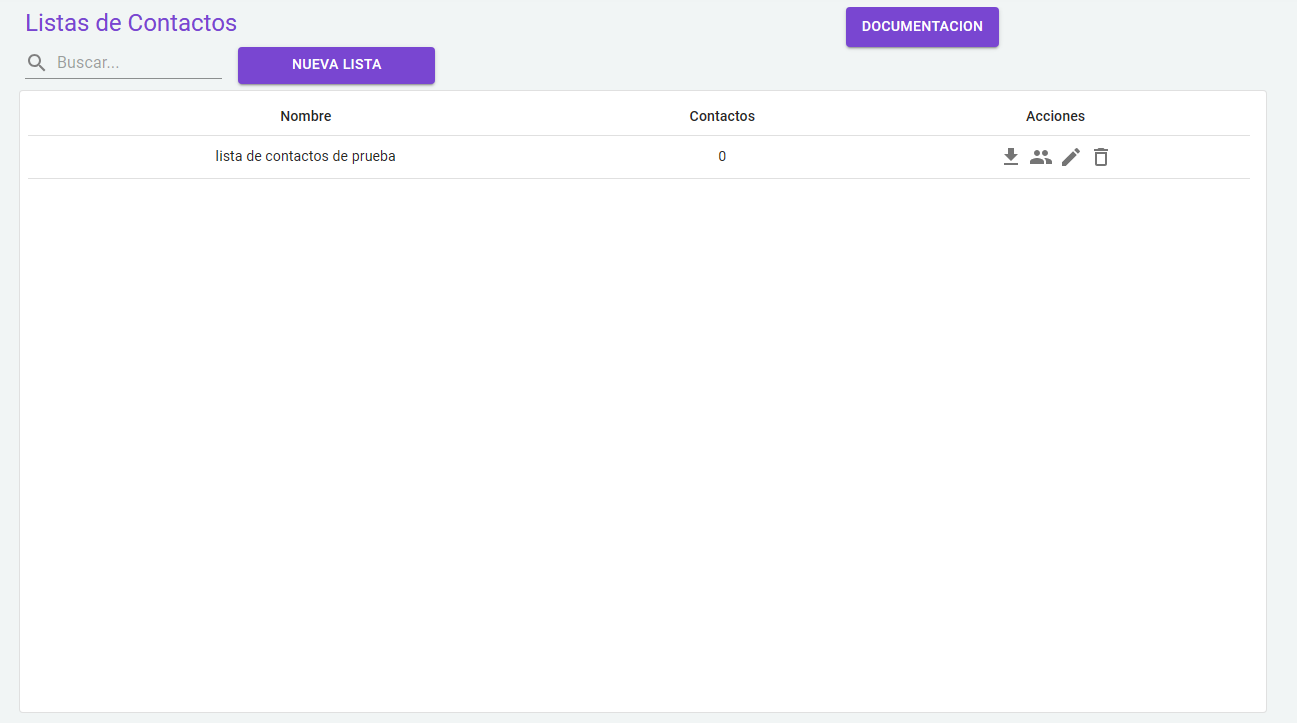
WhatsApp Broadcast Contacts
WhatsApp Broadcast Settings
WaboTifyOpen Ai
WaboTifyDialogFlow
N8N
WaboTifyWebHooks
WaboTifyTypeBot


WaboTify Condiciones De Uso
WaboTify Politicas de Privacidad
WaboTify Politicas de Cookies
WaboTify Variables Disponibles
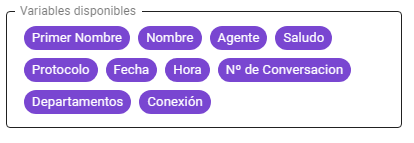
WaboTify Las variables te permiten insertar pequeños fragmentos de codigo con un clic dentro de textos para el envio de mensajes
WaboTifyPrimer Nombre WaboTify Inserta el primer nombre guardado del contacto o el primer nombre que el contacto tenga en su perfil.WaboTifyNombre WaboTify Inserta el nombre completo guardado del contacto o el primer nombre que el contacto tenga en su perfil.WaboTifyAgente IWaboTify Inserta el nombre del agente u operador que esta enviando el mensaje.WaboTifySaludo WaboTify Inserta un saludos automaticamente dependiendo del horario local puede ser Buen dia, buenas tarde, buenas noches.WaboTifyProtocolo WaboTify Inserta Esta funcion es util para automatizar ya que envia una sertie de numeros que hacen alucion a fecha, hora, chat id dando como resultado un numero de 12 digitos o mas que sera diferente en cada mensaje.WaboTifyFecha WaboTify Inserta la fecha actual en el mensaej.WaboTifyHora WaboTify Inserta la hora actual.WaboTifyNº de Conversacion Inserta el Id del chat room de cada conversacion.WaboTifyDepartamentos WaboTify Inserta el nombre del departamento al que el chat esta asignado.WaboTifyConexión WaboTify Inserta el nombre de la conexion que el administrador asigno a la cuenta de WhatsApp.